Sunday, February 11th 2024
Sorry I've been missing in action lately. The holidays and other things have kept me busy. But that doesn't mean I haven't been programing. I've actually been doing a lot of web/javascript development lately on personal projects. One of those projects has been building my own version of a web based solitaire with drag and drop support. While dealing with that, I learned a few things along the way. Today I thought I'd share what I learned in this process.
What's a polyfil?
A polyfil is a piece of code that extends the capabilities of a browser. Say for example, an older version of a browser doesn't support a niffy new HTML5 thing. You could write a "polyfil" and provide support for the missing feature. In my case I'm building a web application that depends on drag and drop. Well not all browsers, especially mobile browsers don't support this feature. The case that surprised me the most, was a fairly recent version of Chrome for Android. Seems odd in 2024, but that's the state of things. So what do you do?
The Solution
Well in my case after a lot of Googling, I found a library/polyfil to do the job. So introducing dragdroptouch by Bernardo-Castilho. This library adds support for a lot of older browsers as well as mobile browsers that nativity don't support drag and drop. For example some recent versions of Chrome on Android do not support this common feature. All I had to do was just include Bendardo's polyfil and off to the races. Problem solved. I can now drag and drop cards and all is right with the world.
I hope this helps someone else who was struggling to find this solution. That's a big part of why I share this on my blog. Hopefully, I'll have my project complete soon and ya'll can enjoy that. Till next time, happy programming.
Categories: Development
Tags: development, javascript
Monday, September 18th 2023
Dashy is a wonderful app for keeping up with all the goodness on your home lab. You can use it to keep track of all your web services and interfaces. It will even ping your services for you and let you know their status. However, it may not be the easiest thing to get going. So I thought I would share how I deployed Dashy in my home lab environment. I like to use Portainer to manage my docker images and containers. With these easy to follow steps you can have Dashy running using Portainer in no time flat.
Step 1: Grab Dashy Docker Compose
Copy The Following
---
version: "3.8"
services:
  dashy:
    # To build from source, replace 'image: lissy93/dashy' with 'build: .'
    # build: .
    image: lissy93/dashy
    container_name: Dashy
    # Pass in your config file below, by specifying the path on your host machine
    # volumes:
      # - /root/my-config.yml:/app/public/conf.yml
    ports:
      - 4000:80
    # Set any environmental variables
    environment:
      - NODE_ENV=production
    # Specify your user ID and group ID. You can find this by running `id -u` and `id -g`
    #  - UID=1000
    #  - GID=1000
    # Specify restart policy
    restart: unless-stopped
    # Configure healthchecks
    healthcheck:
      test: ['CMD', 'node', '/app/services/healthcheck']
      interval: 1m30s
      timeout: 10s
      retries: 3
      start_period: 40s
Step 2: Creating New Stack
- Navigate to Stacks
- Click the "Add Stack" button (upper right corner)
- Give your Stack a name. I called mine "Dashy"
- Paste the compose from above into the Web Editor
- Modify port configuration if needed. Defaults to port 4000
- Scroll down and click "Deploy Stack"
Dashy will finish the rest. After that you should be able to access it on Port 4000 on the same server as your Portainer instance or whatever port you've configured. That was easy wasn't it? As always, use this at your own risk, we are not responsible for damages. Enjoy and stay safe!
Reference:
Dashy Deployment Guide
Categories: Quick Tips
Tags: development, apps, docker, portainer
Monday, March 1st 2021

Making more progress on my on-going marco keyboard project. I'm building a programmable macro pad. My overall goal is to be able to load configs from an SD card. Then give the user a way of selecting a config file from a menu on a OLED display. Well we're almost there. This weekend I wrote some code to allow the user to browse the root of an SD card. When the device is booted up, it will scan the directory of the root and load the filenames into an array. The user can cycle through the list to find the file they want to use. When they reach the bottom the list repeats. For a bonus I loaded the keyboard library and when you press a button the contents of the selected file is written out to the keyboard buffer. Even large files seem to work. This is due to the buffering nature of the file IO class. Feel free to download my code from GitHub!
Categories: Arduino
Tags: development, electronics
Sunday, January 17th 2021
 Introduction
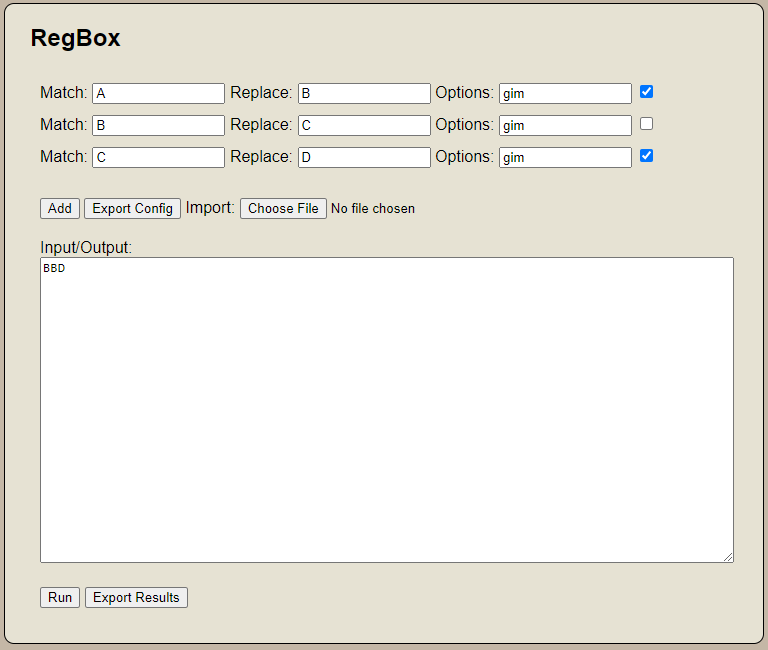
I've been using regular expression a lot lately. I like to use it to generate code. I generally use Notepad++ for this operation. However I've found situations where I repeat the same set of operations. I constantly have to re-enter or dropdown to the previous expression. Often forgetting which order the operations need to be ran in. I figured there has to be a better way. So I wrote a quick web app to help with this. I present to you RegBox. A simple tool for chaining regex find and replace operations. Not only will it chain these operations, but it will allow you to export and import operation chains. This app supports JavaScript regular expression flavor.
How To Use It
Cut and paste the text you want to perform regular expression find and replace on in the "Input/Output" box.
Enter the "Match" and "Replace" criteria.
Set which options you may need (gim - g for global, i for case insensitive, m for multiline by default).
Click "Run" to execute and text will change.
Additional Notes
You can add additional operations by clicking the "Add" button. If you need to disable an operation uncheck the checkbox at the end of the operation line. If multiple operations exist the script will run each operation based on the results of the previous operation (chaining). If you wish to run these operations again in the future, you can export a configuration file containing your operation configuration. Just use the "Export Config" button. You can reimport them later. Need the results of your scripts in a file? Just use the "Export Results" button to save to a text file.
Final Thoughts
This tool is provided as is. No warranty. Use at your own risk. I just built this to solve a problem I have. This may not work for you. But I'm happy to share it with you.
Tool
Categories: Development, Programming, Tools
Tags: development, javascript, regular-expression
Monday, March 2nd 2020
PHP MySQLDump Browser allows users/system admins to browse through MySQL Database Backups (Dump Files).
Users can view and extract individual table structures and or data from MySQL database dumps.
Use this script to avoid restoring entire backups to recover individual tables.
Database dumps complied by mysqldump and phpMyAdmin are compatible with this tool.
Note: This is an unoffical tool released under the GNU General Public License.
PHP MySQLDump Browser creators have no affiliation with Sun Microsystems.
INSTRUCTIONS:
- Place the script on your webserver or webhost in the same directory as your MySQL backup dumps.
- Run the script.
- Choose which backup file you want to search. The script will search through the
dump file for table structures and data. Depending on the size of the dump, this may take some time.
- Once the script has finished indexing the dump file, you may choose which table you wish to extract or
view. By default the results of your query will display in the iframe at the bottom of the page. However
you may download the results to file by clicking the download link above the iframe.
IMPORTANT: Remove PHP MySQLDump Browser as soon as you are finished.
COPYRIGHT AND DISCLAIMER:
THIS SCRIPT IS PROVIDED AS IS, WITHOUT ANY WARRANTY OR GUARANTEE OF ANY KIND
This program is free software; you can redistribute it and/or modify it under the terms of the GNU General
Public License as published by the Free Software Foundation; either version 3 of the License, or (at your option)
any later version. If you change this script or add any features please tell me.
Download
Categories: Development, Programming, Tools
Tags: development, php, programming