Sunday, February 11th 2024
Sorry I've been missing in action lately. The holidays and other things have kept me busy. But that doesn't mean I haven't been programing. I've actually been doing a lot of web/javascript development lately on personal projects. One of those projects has been building my own version of a web based solitaire with drag and drop support. While dealing with that, I learned a few things along the way. Today I thought I'd share what I learned in this process.
What's a polyfil?
A polyfil is a piece of code that extends the capabilities of a browser. Say for example, an older version of a browser doesn't support a niffy new HTML5 thing. You could write a "polyfil" and provide support for the missing feature. In my case I'm building a web application that depends on drag and drop. Well not all browsers, especially mobile browsers don't support this feature. The case that surprised me the most, was a fairly recent version of Chrome for Android. Seems odd in 2024, but that's the state of things. So what do you do?
The Solution
Well in my case after a lot of Googling, I found a library/polyfil to do the job. So introducing dragdroptouch by Bernardo-Castilho. This library adds support for a lot of older browsers as well as mobile browsers that nativity don't support drag and drop. For example some recent versions of Chrome on Android do not support this common feature. All I had to do was just include Bendardo's polyfil and off to the races. Problem solved. I can now drag and drop cards and all is right with the world.
I hope this helps someone else who was struggling to find this solution. That's a big part of why I share this on my blog. Hopefully, I'll have my project complete soon and ya'll can enjoy that. Till next time, happy programming.
Categories: Development
Tags: development, javascript
Monday, October 2nd 2023


Intro
While working on the Matching Quiz, I realized Javascript is missing one of my favorite Python functions: Range. For those who don't use Python, Range allows you to generate a list of numbers. It doesn't sound useful on the surface, but trust me it is. Note I will be using the term list and array interchangeably throughout this article. I'm lazy like that. In Python, range is often used to generate enumeration for loops. In my case I needed to generate a list of numbers in random order. This controls the sorting for the Matching Quiz. Now Python's Range function doesn't do randomization by default, it's something extra I added for my use case. So how do you use Range? It's simple, let's walk through the parameters.
Parameters
The start parameter is the lowest number in your generated set of numbers. For example if you're wanting a list of numbers from 1 to 10, you would specify 1 for the start parameter. Next is the stop parameter. This tells the script to stop generating numbers, however it is not included in the list of numbers. For example if you wanted a list of numbers from 1 - 10, you would have to specify 11 for the stop parameter. This behavior may seem odd at first, but this is how Python implements the function. Next is the step parameter. This parameter is optional. But this allows you to control how many steps between each number in the list. For example, say you want only odd numbers from 1 - 10 in your list. You would start with 1, stop with 11 and step with 2 (range(1, 11, 2)). The end result would be [1, 3, 5, 7, 9]. Pretty neat huh? Ok Matt, what's the random parameter? "randomize_order" is an optional bonus parameter I added for my use case. I needed the numbers to be returned in a random order. It defaults to false, so if you don't pass it. You'll end up with a standard list of numbers.
Usage Example
range(1, 11) //[1, 2, 3, 4, 5, 6, 7, 8, 9, 10]
range(1, 11, 2) //[1, 3, 5, 7, 9]
Code
        function range(start, stop, step = 1, randomize_order = false) {
            let arr = [];

            for(let i = start; i < stop; i += step) {
                arr.push(i);
            }

            if(randomize_order) arr = arr.sort(() => Math.random() - 0.5);

            return arr;
        }
Conclusion
Feel free to grab and use the code as you like. As always it's not our responsibility for damages (if they happen). Yotta yotta. But this is a great away to have the best of both worlds when switching back and forth between Python and Javascript.
Badges courtesy of shields.io & badges.pages.dev
Categories: Programming
Tags: javascript, python
Sunday, October 1st 2023
About The Script
I've been working on putting together a matching quiz app as part of an upcoming feature on my tv and movie car blog. But I wanted to make it reusable by myself and others. How did I pull that off? Well with the power of JSON! Wow, that really does sound like something He-man would say. But anyways. I wrote a basic script to build the quiz using some classes and objects. Then added in some objects to validate and score the quiz. To make it reusable I added in a parameter in the query string to allow the user to pass in a URL for the JSON configuration file (details below). When the parameter "source" is passed the script will load the JSON configuration file from that path and setup the quiz.
Build Your Own Quiz
Building your own quiz is pretty simple. All you need to do is create a JSON configuration file using the template below. Upload the completed JSON configuration file to a public site that allows CORS. I used npoint.io. If using npoint.io, once you've upload the file they'll issue you a special URL. Save this address. Now for the magic. Copy the following URL and replace "" with the special address you saved earlier. Open up the new address in your browser and the quiz will be live. You can share this link with anyone. Or in my case I'll be embedding it in my blog in an iframe like above.
Quiz URL: https://mattkendrick.com/matching-quiz/index.html?source=
Example: https://mattkendrick.com/matching-quiz/index.html?source=https://api.npoint.io/0d89ecf06270394238aa
JSON Configuration Template
{
    "title": "Adam Sandler Characters",
    "instructions": "Match The Character To The Movie.",
    "questions": [
        {
            "left": "Billy",
            "right": "Billy Madison"
        },
        {
            "left": "Happy",
            "right": "Happy Gilmore"
        },
        {
            "left": "Sonny",
            "right": "Big Daddy"
        },
        {
            "left": "Bobby",
            "right": "Water Boy"
        },
        {
            "left": "Robbie",
            "right": "The Wedding Singer"
        },
        {
            "left": "Lenny",
            "right": "Group Ups"
        }
    ]
}
Disclaimer
Feel free to copy and/or use this code at your own risk. We are not responsible for damages that may occur.
Categories: Portfolio
Tags: apps, javascript
Sunday, January 17th 2021
 Introduction
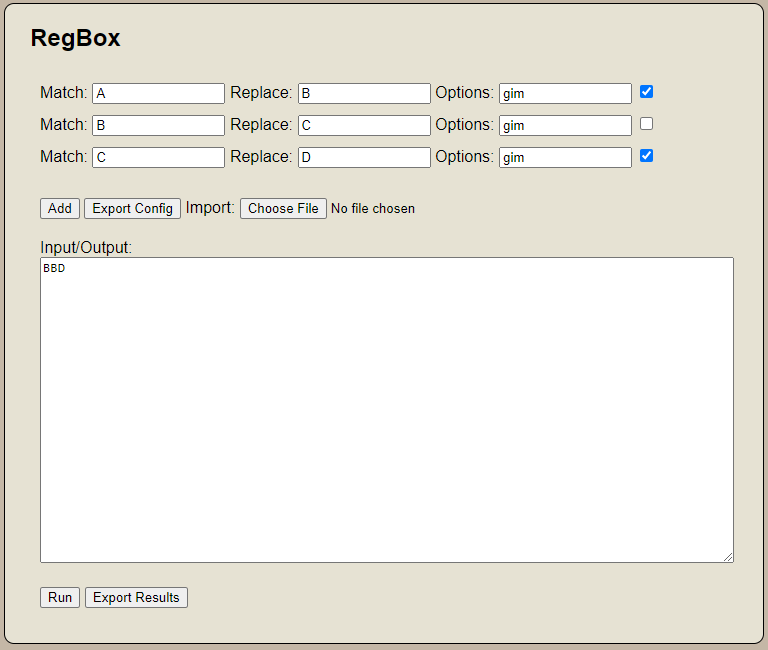
I've been using regular expression a lot lately. I like to use it to generate code. I generally use Notepad++ for this operation. However I've found situations where I repeat the same set of operations. I constantly have to re-enter or dropdown to the previous expression. Often forgetting which order the operations need to be ran in. I figured there has to be a better way. So I wrote a quick web app to help with this. I present to you RegBox. A simple tool for chaining regex find and replace operations. Not only will it chain these operations, but it will allow you to export and import operation chains. This app supports JavaScript regular expression flavor.
How To Use It
Cut and paste the text you want to perform regular expression find and replace on in the "Input/Output" box.
Enter the "Match" and "Replace" criteria.
Set which options you may need (gim - g for global, i for case insensitive, m for multiline by default).
Click "Run" to execute and text will change.
Additional Notes
You can add additional operations by clicking the "Add" button. If you need to disable an operation uncheck the checkbox at the end of the operation line. If multiple operations exist the script will run each operation based on the results of the previous operation (chaining). If you wish to run these operations again in the future, you can export a configuration file containing your operation configuration. Just use the "Export Config" button. You can reimport them later. Need the results of your scripts in a file? Just use the "Export Results" button to save to a text file.
Final Thoughts
This tool is provided as is. No warranty. Use at your own risk. I just built this to solve a problem I have. This may not work for you. But I'm happy to share it with you.
Tool
Categories: Development, Programming, Tools
Tags: development, javascript, regular-expression